Nine-Slice Texture Example
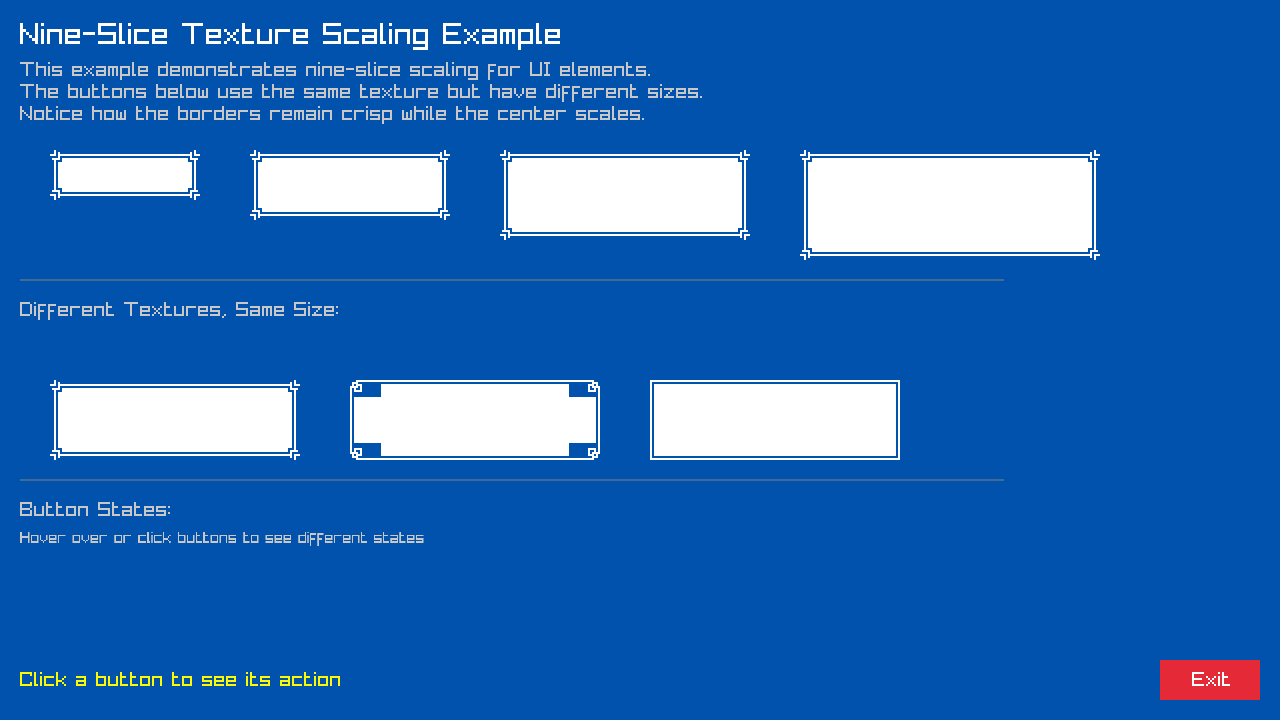
This example demonstrates the nine-slice scaling technique for UI elements in the PopcorningGuineaPig Engine. Nine-slice scaling allows textures to be scaled while preserving the integrity of borders and corners, making it essential for creating scalable UI panels, buttons, and frames.
Overview
The Nine-Slice Texture example is located in examples/nine-slice-texture/ and showcases:
- Nine-Slice Scaling Technique: Proper texture scaling without distortion
- Multiple Button Sizes: Same texture scaled to different dimensions
- Different Texture Types: Various textures demonstrating the technique
- Button States: Normal, hover, and pressed states with nine-slice textures
- Interactive Demo: Click buttons to see status updates
What is Nine-Slice Scaling?
Nine-slice scaling divides a texture into nine regions:
┌─────────┬─────────────┬─────────┐
│ Top-Left│   Top-Mid   │Top-Right│
├─────────┼─────────────┼─────────┤
│Mid-Left │   Center    │Mid-Right│
├─────────┼─────────────┼─────────┤
│Bot-Left │  Bot-Mid    │Bot-Right│
└─────────┴─────────────┴─────────┘
- Corners: Never scaled (preserve pixel-perfect appearance)
- Edges: Scaled in one dimension only
- Center: Scaled in both dimensions to fill remaining space
This technique ensures UI elements look crisp at any size without stretching artifacts.
Key Features
1. Basic Nine-Slice Implementation
Creating nine-slice rectangles for a texture:
// Load texture
panelTexture1 = Raylib.LoadTexture(Path.Combine(Directory.GetCurrentDirectory(), "assets", "kenney", "panel-000.png"));

// Create nine-slice rectangles with 12-pixel corners
Rectangle[] nineSliceRects1 = Button.CreateNineSliceRects(panelTexture1, 12);

// Create button using nine-slice scaling
sameTextureButtons[0] = new Button(
    panelTexture1,
    new Vector2(50, 150),
    new Vector2(150, 50),
    nineSliceRects1
);
2. Multiple Sizes with Same Texture
Demonstrating scalability without quality loss:
// Small button (150x50)
sameTextureButtons[0] = new Button(panelTexture1, new Vector2(50, 150), new Vector2(150, 50), nineSliceRects1);
sameTextureButtons[0].SetText("Small");

// Medium button (200x70)
sameTextureButtons[1] = new Button(panelTexture1, new Vector2(250, 150), new Vector2(200, 70), nineSliceRects1);
sameTextureButtons[1].SetText("Medium");

// Large button (250x90)
sameTextureButtons[2] = new Button(panelTexture1, new Vector2(500, 150), new Vector2(250, 90), nineSliceRects1);
sameTextureButtons[2].SetText("Large");

// Extra large button (300x110)
sameTextureButtons[3] = new Button(panelTexture1, new Vector2(800, 150), new Vector2(300, 110), nineSliceRects1);
sameTextureButtons[3].SetText("Extra Large");
3. Different Textures with Nine-Slice
Various texture types with different corner sizes:
// Standard corner size (12 pixels)
Rectangle[] nineSliceRects1 = Button.CreateNineSliceRects(panelTexture1, 12);

// Standard corner size (12 pixels)
Rectangle[] nineSliceRects2 = Button.CreateNineSliceRects(panelTexture2, 12);

// Larger corner size (16 pixels) - for textures with bigger decorative elements
Rectangle[] nineSliceRects3 = Button.CreateNineSliceRects(panelTexture3, 16);
4. Interactive Status Updates
Button click handling with status feedback:
private string[] buttonActions = new string[] {
    "Button Clicked: Small",
    "Button Clicked: Medium",
    "Button Clicked: Large",
    "Button Clicked: Extra Large"
};

// Set button actions
sameTextureButtons[0].SetOnClick(() => UpdateStatus(buttonActions[0]));
sameTextureButtons[1].SetOnClick(() => UpdateStatus(buttonActions[1]));
sameTextureButtons[2].SetOnClick(() => UpdateStatus(buttonActions[2]));
sameTextureButtons[3].SetOnClick(() => UpdateStatus(buttonActions[3]));

private void UpdateStatus(string message)
{
    statusLabel.SetText(message);
}
Scene Structure
Initialization
The scene loads multiple textures and creates various button configurations:
public override void Load()
{
    // Load multiple panel textures
    panelTexture1 = Raylib.LoadTexture(Path.Combine(Directory.GetCurrentDirectory(), "assets", "kenney", "panel-000.png"));
    panelTexture2 = Raylib.LoadTexture(Path.Combine(Directory.GetCurrentDirectory(), "assets", "kenney", "panel-002.png"));
    panelTexture3 = Raylib.LoadTexture(Path.Combine(Directory.GetCurrentDirectory(), "assets", "kenney", "panel-015.png"));

    // Create informational labels
    titleLabel = new Label("Nine-Slice Texture Scaling Example", new Vector2(20, 20), 30, Color.White);
    explanationLabel = new Label(
        "This example demonstrates nine-slice scaling for UI elements.\n" +
        "The buttons below use the same texture but have different sizes.\n" +
        "Notice how the borders remain crisp while the center scales.",
        new Vector2(20, 60), 20, Color.LightGray);

    // Create demonstration buttons...
}
Update Loop
Handle button interactions:
public override void Update(double deltaTime)
{
    // Update all same-texture buttons
    foreach (var button in sameTextureButtons)
    {
        button.Update();
    }

    // Update all different-texture buttons
    foreach (var button in differentTextureButtons)
    {
        button.Update();
    }

    // Update exit button
    exitButton.Update();
}
Rendering
Display organized sections with visual separators:
public override void Render(int width, int height)
{
    Raylib.ClearBackground(Color.DarkBlue);

    // Draw informational labels
    titleLabel.Draw();
    explanationLabel.Draw();
    statusLabel.Draw();

    // Draw same-texture buttons section
    foreach (var button in sameTextureButtons)
    {
        button.Draw();
    }

    // Visual separator
    Raylib.DrawLine(20, 280, width - 20, 280, Color.Gray);

    // Draw different-texture buttons section
    Raylib.DrawText("Different Textures, Same Size:", 20, 300, 20, Color.LightGray);
    foreach (var button in differentTextureButtons)
    {
        button.Draw();
    }

    // Another separator and additional info
    Raylib.DrawLine(20, 480, width - 20, 480, Color.Gray);
    Raylib.DrawText("Button States:", 20, 500, 20, Color.LightGray);
    Raylib.DrawText("Hover over or click buttons to see different states", 20, 530, 16, Color.LightGray);

    exitButton.Draw();
}
Running the Example
Prerequisites
- .NET 10.0 or later
- PopcorningGuineaPig.Engine reference
- Raylib-cs package
Build and Run
cd examples/nine-slice-texture/NineSliceExample
dotnet build
dotnet run
Project Structure
NineSliceExample/
├── NineSliceExample.csproj     # Project file
├── MyGame.cs                   # Game initialization
├── Program.cs                  # Entry point
├── README.md                   # Example documentation
├── assets/
│   └── kenney/                 # Kenney UI pack textures
│       ├── panel-000.png       # Basic panel texture
│       ├── panel-002.png       # Blue panel texture
│       └── panel-015.png       # Decorative panel texture
└── scenes/
    └── NineSliceExampleScene.cs # Main scene implementation
What You'll Learn
- Nine-Slice Scaling Concept: Understanding how textures are divided and scaled
- Corner Size Selection: Choosing appropriate corner sizes for different textures
- Button Creation: Using nine-slice textures for scalable buttons
- Multiple Texture Management: Loading and using different panel textures
- Interactive UI: Creating clickable buttons with status feedback
- Scene Organization: Structuring educational examples with clear sections
- Resource Management: Proper texture loading and cleanup
Technical Details
Corner Size Guidelines
- Small Details: Use 8-12 pixel corners for simple borders
- Medium Details: Use 12-16 pixel corners for standard decorations
- Large Details: Use 16-24 pixel corners for ornate textures
- Rule of Thumb: Corner size should be slightly larger than the border width
Nine-Slice Rectangle Creation
The engine provides helper methods for creating nine-slice rectangles:
public static Rectangle[] CreateNineSliceRects(Texture2D texture, int cornerSize)
{
    Rectangle[] rects = new Rectangle[9];

    // Top row
    rects[0] = new Rectangle(0, 0, cornerSize, cornerSize);                    // Top-left
    rects[1] = new Rectangle(cornerSize, 0, texture.Width - 2 * cornerSize, cornerSize); // Top-mid
    rects[2] = new Rectangle(texture.Width - cornerSize, 0, cornerSize, cornerSize);     // Top-right

    // Middle row
    rects[3] = new Rectangle(0, cornerSize, cornerSize, texture.Height - 2 * cornerSize); // Mid-left
    rects[4] = new Rectangle(cornerSize, cornerSize, texture.Width - 2 * cornerSize, texture.Height - 2 * cornerSize); // Center
    rects[5] = new Rectangle(texture.Width - cornerSize, cornerSize, cornerSize, texture.Height - 2 * cornerSize); // Mid-right

    // Bottom row
    rects[6] = new Rectangle(0, texture.Height - cornerSize, cornerSize, cornerSize);     // Bot-left
    rects[7] = new Rectangle(cornerSize, texture.Height - cornerSize, texture.Width - 2 * cornerSize, cornerSize); // Bot-mid
    rects[8] = new Rectangle(texture.Width - cornerSize, texture.Height - cornerSize, cornerSize, cornerSize); // Bot-right

    return rects;
}
Memory Management
Proper cleanup of texture resources:
public override void Unload()
{
    // Unload all textures to free memory
    Raylib.UnloadTexture(panelTexture1);
    Raylib.UnloadTexture(panelTexture2);
    Raylib.UnloadTexture(panelTexture3);
}
Best Practices
- Consistent Corner Sizes: Use similar corner sizes across related UI elements
- Texture Selection: Choose textures designed for nine-slice scaling
- Performance: Reuse nine-slice rectangle arrays when possible
- Testing: Test with various sizes to ensure quality scaling
- Asset Organization: Keep UI textures in organized directories
- Documentation: Document corner sizes for each texture
Common Use Cases
- Dialog Boxes: Scalable dialog backgrounds
- Button Variants: Multiple button sizes with consistent appearance
- Panel Systems: Inventory panels, menus, and windows
- Progress Bars: Scalable bar backgrounds and borders
- Tooltip Backgrounds: Dynamic tooltip sizing
- Frame Elements: Decorative borders around content
Related Documentation
- Nine-Slice Textures - Detailed nine-slice implementation
- UI Components - Button and panel components
- Layouts and Positioning - UI layout systems
- Asset Registry - Texture management
- Main Menu Example - Traditional UI creation patterns
Next Steps
After exploring this example, consider:
- Create Custom Textures: Design your own nine-slice compatible textures
- Implement Panels: Use nine-slice scaling for dialog boxes and panels
- Animation Integration: Animate nine-slice elements (size changes, color transitions)
- Theme System: Create switchable UI themes using different nine-slice textures
- Advanced Patterns: Implement nested nine-slice elements
- Performance Optimization: Optimize nine-slice rendering for mobile platforms
The nine-slice technique is fundamental for professional-looking scalable UI systems, and this example provides a solid foundation for implementing it in your own projects.